I have adapted some work that I did a while back on the Samsung Captivate Glide (i927), the official post, etc, can be found here: http://forum.xda-developers.com/captivate-glide/general/samsung-captivate-glide-debian-chatter-t3233807
A Debian phone. Not run as a tack on, not emulated, not on top of Android, but standalone. That’s my goal. That’s what I’ve was working on. Turning an old Glide into a computer. After some careful thought, I figured some other people might be interested in that too, so I thought I’d post it here. By God’s grace, it even worked as a computer. Cell phone service is still beyond my reach, but perhaps others can pick up where I left off.
Why Debian “Chatter”? Well, all Debian versions are given a name from a toy in the Pixar film Toy Story. Chatter happens to be the toy telephone in Toy Story 3. I put Chatter in quotes because it actually is not an official release. Technically, I am using Debian Jessie. Since becoming a release of Debian would be nearly impossible to spearhead from the ground level, it would most likely become an offshoot of Debian.
What I have done so far is utilize the internal “sdcard” partition as the root file system for Debian Jessie.
What’s working:
– Standard Linux functions (mostly)
– Boot up to the X server (XFCE window manager currently)
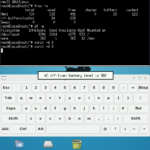
– Screen, orientation and display
– Physical keyboard (Only the qwerty part)
– Touch-screen as a touch pad to move the mouse pointer
– Battery indication including if it is charging or not
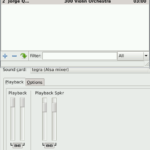
– Audio with ALSA.
– Volume buttons
– Front soft keys
Flashing instructions if your Captivate Glide already has TWRP.
[url]http://www.mediafire.com/download/z9fzrw68rio8sq9/recoveryTWRP.img[/url]
1. Download my TWRP backup, and put under the /TWRP/BACKUPS/<SERIALNUMBER>/ folder.
[url]https://www.mediafire.com/folder/9vifxpouh9voc/2015-10-20[/url]
2. Restore the image through the Restore function in TWRP.
3. Download my tar.gz file to your computer and extract it.
[url]http://www.mediafire.com/download/716x1oxcglythhk/20151102.tar.gz[/url]
Or,
[URL=”http://www.mediafire.com/download/88r6sr3u33bs532/20151106.tar.gz”]http://www.mediafire.com/download/88r6sr3u33bs532/20151106.tar.gz[/URL]
4. Put your phone into the TWRP recovery, and choose the Mount option and select “sdcard”
5. Place the extracted contents of the dated folder onto the sdcard partition, but not the dated folder itself, just what is in it.
6. Reboot your phone into the ODIN download mode.
7. Download my 2ndboot.img file and i927.pit file.
[url]http://www.mediafire.com/download/mudjm3j3304vt77/2nboot.img[/url]
[url]http://www.mediafire.com/download/793j89i277rggpa/i927.pit[/url]
8. Using Heimdall-frontend, select the pit file, and flash the LNX partition with the 2ndboot.img file.
9. Reboot and Linux on!
Flashing instructions if your Captivate Glide already has Clockworkmod.
[url]http://www.mediafire.com/download/f64i073d65e0ug1/recoverycwm.img[/url]
1. Download my copy of Bio360Rom.zip and move it to your phones sdcard.
[url]http://www.mediafire.com/download/1u2v6aac19fzh97/Bio360ROM.zip[/url]
2. Reboot into recovery mode (Clockworkmod) and install the Bio360Rom.zip
3. Reboot your phone into the ODIN download mode.
4. Download my 2ndboot.img file, my recovery.img file, and i927.pit file.
[url]http://www.mediafire.com/download/mudjm3j3304vt77/2nboot.img[/url]
[url]http://www.mediafire.com/download/z9fzrw68rio8sq9/recoveryTWRP.img[/url]
[url]http://www.mediafire.com/download/793j89i277rggpa/i927.pit[/url]
5. Using Heimdall-frontend, select the pit file, and flash the LNX partition with the 2ndboot.img file.
6. Again using Heimdall-frontend, select the pit file, and flash the SOS partition with the recovery.img file.
7. Put your phone into the TWRP recovery, and choose the Mount option and select “sdcard”
8. Download my tar.gz file to your computer and extract it. Place the extracted contents of the dated folder onto the sdcard partition, but not the dated folder itself, just what is in it.
[url]http://www.mediafire.com/download/716x1oxcglythhk/20151102.tar.gz[/url]
Or,
[URL=”http://www.mediafire.com/download/88r6sr3u33bs532/20151106.tar.gz”]http://www.mediafire.com/download/88r6sr3u33bs532/20151106.tar.gz[/URL]
9. Reboot and Linux on!
Optional instructions:
If you want to, head over to the Debian Jessie download page and download the arm version of the DVD’s 1 and/or 2. In the following posts I describe how you can rip these cd’s to set up a personal repository, one that you can strictly control all of the packages, which may be useful at this time.
Changelog:
[CODE]
Changelog – Debian “Chatter” using Canium Kernel
20151106
– Added shutdown.sh and reboot.sh to launcher for *better* handling of shutdown.
20151102
– Mapped soft keys: search – xfce-appfinder
– Mapped soft keys: back – xfce-next workspace
– Mapped soft keys: home – xfce showdesktop
– Mapped soft keys: menu – xfce-showmenu
– Mapped volume up/down to amixer Master +/- 5db.
– Added “event2” to xorg.conf. Volume buttons and power button are recognized and can now be mapped to an action.
– Added “event7” to xorg.conf. front soft keys are recognized and can now be mapped to an action.
– Enabled xfce splash screen (like a boot animation.) Also enabled text update of status during start of xfce.
20151101
– Edited xfce panel and options for display of information.
20151020-2
– Moved entire system off of sdcard and onto mmcblk0p4, the “internal sdcard” of the phone.
20151020
– Due to errors with Pulseaudio, removed pavucontrol/pulseaudio. Installed all Alsa controls.
– Installed LXMusic/xmms2 for mp3 player.
– Mixer and alsa mixer can properly set volume to path SPK_HP (the speaker or headphone) and adjust the volume. However, it will mute after a few moments of inactivity. A work in progress.
20151019 Continuing the current fork of Cranium Kernel.
– Udevd is not working due to lack of devtmpfs support in kernel. Added mdev support for hotplug items by editing init.stage2 with:
/sbin/busybox echo /sbin/busybox mdev > /proc/sys/kernel/hotplug
20151018
– Backed up entire system, forking to other kernels. This backup will remain with all that is done so far. The fork has a seperate changelog.
20151016
– Enabled usb0 as a network interface in /etc/network/interfaces, can start with ~# ifup usb0.
-On receiving computer, ensure that you insmod “mii.ko” and “usbnet.ko” if not already built into your kernel. -cannot figure out how to attach to it!
^– I now realize that I would need to recompile my desktop computer kernel to support this endevour. This would distract from the process at hand. Scrapped.
– Added second armhf dvd from Debian Jessie to my local repository, and edited /etc/apt/sources to match.
20151015
– Edited xbattbar.sh script to accurately reflect if the phone is plugged in or not. – Put into 20151014 folder.
20151014
– Needed battery indicator. Added xbattbar as it is the only battery indicator with user scriptable inputs.
– Wrote script for xbattbar to work, now accurately reflects battery capacity.
– Put xbattbar in .xsession and removed xclock from .xsession
20151013
– Added XFCE4 and set as default for root in /root/.xsession file with xclock on startup for fun.
20151010
– Added local repository under folder /repo/all
– Used dpkg-scan to create Packages.gz
– Added local repository to /etc/apt/sources.list
20151008
– Added Keyboard to xorg.conf, some keys work, some do not.
20151005
– Added touchscreen to xorg.conf as “corepointer”, works to move mouse.
20150924
– Created new initramfs.cpio.gz
– Created new_boot.img
– Copied another init script and init.stage2 script onto sdcard and edited for my purposes.
– Originally booted to Linux, then started Android, and Android was what you saw.
– Edited init and init.stage2 script so that it now boots Linux, and you see Linux. Android is running in chroot env. but cannot start fully due to /dev/graphics/fb0 is in use.
20150921
– Started with debootstrap base image of Debian Jessie
– Added openssh, vnc, lxde, jwm, and some other programs through emulator.
– Broke down Biorom kernel and initramfs. Using Cranium Kernel.
[/CODE]
If you are interested in working on this project as well, please feel free to work on it! You can work independently or with me on this if you would like. You are welcome to post here, or to contact me through XDA’s message service, or post on XDA.
The current passwords are:
root = root
trondroid = trondroid
me = me
In the next few days, I plan to post some more info, and how you can port this to any Android phone, so stay tuned!
Linux – keep it simple