If you are still with me, then you have already set up your phone to first boot Debian Linux, and then Linux will start Android in a chroot environment. Your phone is actually already running Debian Linux, just with Android being run and displayed on the screen. At any moment, you can actually stop or kill Android. At this point, you also have the power to mess Andriod up, so do be careful!
If you just tuned in, I recommend that you go back to the 1 of 3 for this post, as there is a lot of critical information you need.
Right now, you can SSH into your own Linux from the Android gui by using any ssh app to yourself as the local host, since our SSH deamon is running. What we want, though, is for your screen to display the Linux screen, instead of the Android that is running in a chroot environment.
A key part of all of this, is that Android, other than through services like SSH, does not know that Debian Linux exists and it does not have any control over the Linux system or functions. One problem with this is that Android may occaisionally crash due to memory problems, if your Linux environment is using too much RAM. Ironically, if you SSH into your Linux environment, you can use ps aux, or top to see all of Android’s running processes. Your Linux environment is now the ultimate root, because even Android doesn’t know it exists. You can log anything from Android and save it, you can stop any Android process. You have complete control over your Android system.
However, before making the “plunge” to a Linux only phone, you need a few details. The easiest way to get these is to do some research on your phone. Through SSH, run the ls command in your /dev folder, and look for “input”
[CODE]
$ cd /dev
$ ls |grep input
/dev/input
/dev/input/event7
/dev/input/event6
/dev/input/event5
/dev/input/event4
/dev/input/event3
/dev/input/event1
/dev/input/event0
/dev/input/event2
[/CODE]
On my Samsung Captivate Glide, these are all the available inputs. But what are they? Well, there are several tools to check this. The easiest way, however, is to SSH into Linux, start x11vnc in Linux, and use an app like bvncfree in Android to bring up a visual screen to work with. How you need to do this is a bit tough to describe, because it is so dependent upon your phone and setup. However, if you are using my files, the user trondroid should have a shell script in the home folder for starting jwm in this fashion.
Another way is to start the XserverXDSL app in Android, and then startx in Linux through SSH. That should get you to the same place.
Either way, you should see something similar to this (although this screenshot was taken when I was using Debian Squeeze, rather than the new files, which are Debian Jessie) :
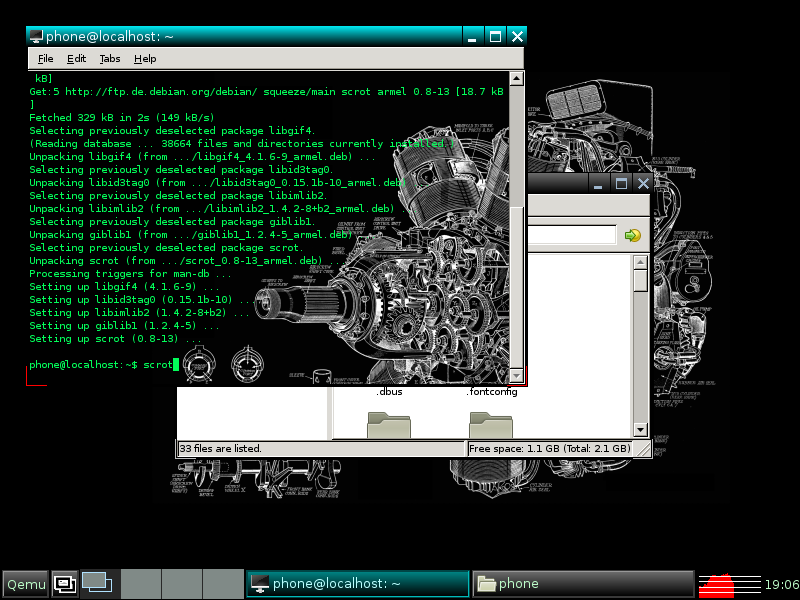
Once you have established a “visual” screen, you now should open up a terminal in your Linux screen. Remember, all input commands that you input right now are from the Android app you are using. That means the “mouse”, “click”, and “keyboard” are all virtual. You need to set up your real screen as a mouse, for motion and clicking. You also need to set up your physical buttons from your phone, and your keyboard if you have one. With your terminal open, use evtest, like so:
[CODE]
$ sudo evtest
No device specified, trying to scan all of /dev/input/event*
Available devices:
/dev/input/event0: STMPE_keypad
/dev/input/event1: mpu-accel
/dev/input/event2: sec_key
/dev/input/event3: sec_touchscreen
/dev/input/event4: proximity_sensor
/dev/input/event5: light_sensor
/dev/input/event6: HALL
/dev/input/event7: sec_touchkey
/dev/input/event8: compass_sensor
[/CODE]
This even works on your home computer. For instance, here is my laptop:
[CODE]
$ sudo evtest
No device specified, trying to scan all of /dev/input/event*
Available devices:
/dev/input/event0: Sleep Button
/dev/input/event1: Lid Switch
/dev/input/event2: Power Button
/dev/input/event3: AT Translated Set 2 keyboard
/dev/input/event4: Logitech USB Optical Mouse
/dev/input/event5: SynPS/2 Synaptics TouchPad
/dev/input/event6: Video Bus
/dev/input/event7: ST LIS3LV02DL Accelerometer
/dev/input/event8: HDA ATI SB Mic
/dev/input/event9: HDA ATI SB Line
/dev/input/event10: HDA ATI SB Headphone
/dev/input/event11: HP WMI hotkeys
Select the device event number [0-11]:
[/CODE]
But we will focus on the phone. Great! Now we know what event is what input! For instance, event3 is the touchscreen. Now we have something to work with. In my case, event0 is the physical keyboard, but those are rare these days.
You can also test those inputs, by choosing a number for the device, and then using that function. Here you can see me test the “menu key” on the keyboard:
[CODE]
Menu Key on keyboard
Event: time 25170.575766, type 4 (EV_MSC), code 4 (MSC_SCAN), value 8b
Event: time 25170.575844, type 1 (EV_KEY), code 139 (KEY_MENU), value 0
Event: time 25170.575854, ————– EV_SYN ————
[/CODE]
Another great tool is called xev, again, open up a terminal and use it like this:
[CODE]
$ xev
ButtonRelease event, serial 33, synthetic NO, window 0x1e00001,
root 0x26f, subw 0x0, time 156984900, (175,123), root:(228,195),
state 0x100, button 1, same_screen YES
MotionNotify event, serial 33, synthetic NO, window 0x1e00001,
root 0x26f, subw 0x0, time 156985076, (177,123), root:(230,195),
state 0x0, is_hint 0, same_screen YES
[/CODE]
There is also xinput, here is an output from my computer:
[CODE]
$ xinput test-xi2
⎡ Virtual core pointer id=2 [master pointer (3)]
⎜ ↳ Virtual core XTEST pointer id=4 [slave pointer (2)]
⎜ ↳ Logitech USB Optical Mouse id=9 [slave pointer (2)]
⎜ ↳ SynPS/2 Synaptics TouchPad id=11 [slave pointer (2)]
⎣ Virtual core keyboard id=3 [master keyboard (2)]
↳ Virtual core XTEST keyboard id=5 [slave keyboard (3)]
↳ Power Button id=6 [slave keyboard (3)]
↳ Video Bus id=7 [slave keyboard (3)]
↳ Sleep Button id=8 [slave keyboard (3)]
↳ AT Translated Set 2 keyboard id=10 [slave keyboard (3)]
↳ HP WMI hotkeys id=12 [slave keyboard (3)]
EVENT type 13 (RawKeyPress)
device: 3 (10)
detail: 54
valuators:
cEVENT type 14 (RawKeyRelease)
device: 3 (10)
detail: 54
valuators:
EVENT type 13 (RawKeyPress)
device: 3 (10)
detail: 40
valuators:
[/CODE]
The overall idea, though, is that you need to open up an x session, so you can then see what x inputs are matched to which event. Once you have all of this information, you can edit the /etc/X11/xorg.conf file to match. Here is the one I made for the Samsung Captivate Glide:
[CODE]
Section “ServerLayout”
Identifier “Layout0”
Screen “Screen0”
InputDevice “touchscreen” “CorePointer”
InputDevice “keyboard”
InputDevice “mediakeys”
InputDevice “frontkeys”
EndSection
Section “Monitor”
Identifier “Monitor0”
ModelName “Monitor Model”
DisplaySize 800 480
EndSection
Section “InputDevice”
Identifier “touchscreen”
Driver “evdrv”
Option “Device” “/dev/input/event3”
Driver “multitouch”
EndSection
Section “InputDevice”
Identifier “keyboard”
Driver “evdev”
Option “Device” “/dev/input/event0”
Option “CoreKeyboard”
Option “XkbRules” “xorg”
Option “XkbModel” “pc105”
Option “XkbLayout” “us”
EndSection
Section “InputDevice”
Identifier “keyboard”
Driver “evdev”
Option “Device” “/dev/input/event8”
Option “XkbRules” “xorg”
Option “XkbModel” “pc105”
Option “XkbLayout” “us”
EndSection
Section “InputDevice”
Identifier “mediakeys”
Driver “evdev”
Option “Device” “/dev/input/event2”
EndSection
Section “InputDevice”
Identifier “frontkeys”
Driver “evdev”
Option “Device” “/dev/input/event7”
EndSection
Section “Device”
Identifier “Card0”
Driver “fbdev”
Option “fbdev” “/dev/graphics/fb0”
Option “Rotate” “left”
Option “VertRefresh” “60”
EndSection
Section “Screen”
Identifier “Screen0”
Device “Card0”
DefaultDepth 16
SubSection “Display”
Depth 16
EndSubSection
EndSection
[/CODE]
Notice how you must declare a screen, a monitor, and then the card that controls it. /dev/graphics/fb0 is the framebuffer that you got the other day, if you were following along with these posts. You will also notice, that for each section, a driver is declared. The drivers used here are generic drivers. You may have different hardware, and use different drivers. So, if one doesn’t work, google the xorg.conf section and the word drivers to see some of the different drivers available. You may even need proprietary drivers specific for your device. Like I said though, these generic drivers worked great for me. So I would try those first.
Once you have your drivers and xorg.conf file all set, it is time to take the plung. Be sure to back up your system first. Remember, TWRP or CWM are your freinds, as they work outside of all of the other work you are doing. So you can always start over or go back to something else.
Now, go back to your /etc/rc.local file. It should say:
[CODE]
#!/bin/sh -e
#
# rc.local
#
# This script is executed at the end of each multiuser runlevel.
# Make sure that the script will “exit 0” on success or any other
# value on error.
#
# In order to enable or disable this script just change the execution
# bits.
#
# By default this script does nothing.
# Start the ssh client, in the event you need it.
/etc/init.d/hostname.sh start
/etc/init.d/ssh start
# Clean up bad crash before starting x server.
# /sbin/busybox mkdir -p /tmp/.X11-unix/remove
# /sbin/busybox rmdir /tmp/.X11-unix/remove
# /sbin/busybox rmdir /tmp/.X11-unix/
# Start the x server, warning, if the touchscreen or keypad doesn’t work
# then you cannot escape without killing power!
#/usr/bin/startx &
#export USER=root
#vncserver :5000
exit 0
[/CODE]
And change the last part to say this:
[CODE]
# Start the x server, warning, if the touchscreen or keypad doesn’t work
# then you cannot escape without killing power!
/usr/bin/startx &
#export USER=root
#vncserver :5000
exit 0
[/CODE]
Now you have told it to startx on the next startup. If all goes well, reboot your phone, and you should see the XFCE desktop. If not, then you need to figure out how to edit the xorg.conf file to make it work right. You may also need to uncomment the lines about rmdir /tmp/.X11-unix, and the other lines like it, if your xserver ever crashes.
I have noticed several variants, especially on Android 4.4 and newer, that it will startx, but also start Android. You will see one normally, and then a small, pink version of the other overlayed on part of the screen. Almost like a picture in picture TV, but very dificult to understand or use. In these cases, you may need to add a command to kill surfaceflinger, or stop zygote to get Android to “clear out”. You actually could just skip Android altogether, but having the chrooted Android is great for playing with making phone calls, etc, as I do not know how to do that from Linux yet.
If you made this work then you do have some pretty good Linux skills, if I may be so bold. This is not an easy task, and not for the faint of heart. So great job! Now it is up to you to improve upon this and make it useful. Who knows, you might be giving Ubuntu Touch a run for the money!
Linux – keep it simple.
Hi, do you still have this phone?
It would be a very good target for porting PostmarketOS onto it, which has made huge strides toward a universal libre phone stack..
my i927 is still running KK 4.4.4 and a debian chroot, but I’m so looking forward to getting rid of the pesky android java dalvik overhead & security fails… exams right now though x-D
I do still have an old i927, but it does not work very well anymore. After a few seconds the screen blitzes and turns green, then the phone shuts off. That’s why I discontinued working on this a while back. I’ll look into postmarketOS, though!