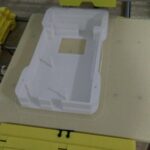
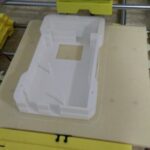
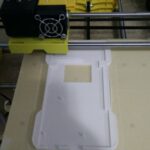
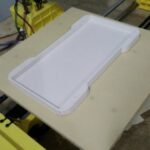
After printing the low resolution LTE project case, I found that I needed to make a few adjustments. Fortunately, since I had saved all the work, I could just edit the file and print again. This time I tried several “hi-res” prints. If you are working through this project, or want to see the stl files, you can download them from my MediaFire account.
Overall, I think the new version of the print will work well. However, I had several issues with the Slic3r settings that made things interesting. Slic3r is a program that takes your stl file and slices it into layers of G-Code that the 3D printer actually reads to build objects. What I found was rather interesting to me, perhaps you’ll think so as well.
Using Slic3r as a stand alone program with default settings yields different results that using Slic3r through the Repetier-Host program with the same settings.
This may seem odd, but with the same default settings applied to Slic3r, you get entirely different results if you slice it in Repetier than if you run Slic3r stand alone. For convenience, Repetier (the 3D printer controller program) can call Slic3r for you, meaning you just load an stl file, click slice, and it calls Slic3r, gets the g-code, and prints. Or, you can open Slic3r by itself, load the stl file, and slice it there. Doing this both ways with the same default settings will print two very different looking objects.
I found the better option is to open Slic3r directly, slice the stl to g-code, then open it as g-code in Repetier. However, when I do this, I have to offset the Y coordinates to get it centered on the Repetier “plate”. This can be very annoying when your print is the maximum sized object that you can print. But doing it this way produces the best product.
There are dozens of settings that dramatically change what your print will look like.
There are settings for everything in Slic3r. And each setting seems to make an entirely different print when I’m done. A person could spend days fiddling with the settings to try to make perfect prints. I guess I sort of thought that by now the process would be a bit more “plug and play”. Any thing that I’ve downloaded thus far to print, the author must have known all of the good settings, because the objects print perfectly. But my own projects is another story. Lots of time was spent online trying to figure out what settings would work best, and then it still came down to a bit of trial and error.
Side notes about printing.
After having printed this project, I came to a few conclusions:
- Print smaller parts if possible. My LTE project top is twice the size of the LTE project bottom, and the bottom is a much better print than the top (smaller size, less warping, less defects).
- While I’m glad I bought this cheaper printer, you do get what you pay for. Although I’d still recommend it for beginners.
- If the power goes out in the middle of printing, you pretty much wasted 4+ hours and a lot of filament. (Suggestion: UPS battery backup for the computer AND the 3D printer.)
- If the print temperature is too hot, you can’t get your model off of the tray.
- If the print temperature is too cold, you can’t get your model to stick together.
Just a few random musings on 3D printing. Now on to using the new case for my project!
Linux – keep it simple.