My brother (LibreHacker) and I both run Gemlogs in Gemini space. If you are curious about that, I’ve written about it on here before, or you can check out websites like: https://geminiprotocol.net/clients.html and https://portal.mozz.us/gemini/geminiprotocol.net/ to get a better idea, but it is a protocol, like http, but lightweight and with a few other changes, pros, and cons. In fact, this entire blog is mirrored in Gemini space. You can see it here if you have a gemini browser: gemini://alaskalinuxuser.ddns.net or check out the LibreHacker as well here: gemini://gem.librehacker.com if you are interested.
That said, LibreHacker brought an interesting challenge to my attention. It is called ROOPHLOCH, and stands for Remote Outdoor Off-grid PHLogging CHallenge. It is a month long challenge for the Gemini and Gopher communities which happens every September. Essentially, the challenge has two main parts:
- Get outside, or at least not be in any permanent man made shelter.
- Use a different method than your usual internet and power routines to make your post.
Essentially, it is an exercise in doing things in a different way than usual. Most of us sit in our cozy office chairs and type up our blogs on our typical home computer while from the comfort of our home with blazing fast internet and stable power. The point of ROOPHLOCH seems to be to challenge yourself to do something different, and perhaps even a little out of your comfort zone.
So I gave it a try. Actually, you can read my entire post below:
ROOPHLOCH
Today’s post is a little bit different. It will be followed by another post with more detail, as this is painfully slow.
I am writing to meet the ROOPHLOCH challenge. For the uninformed, as I was, it means the Remote Outdoor Off-Grid Phlogging Challenge. I think they need to revisit their letters in their name, but they call it ROOPHLOCH. The goal is to get outside. The secondary goal is to make your usual gemini or gopher blog post while using some unusual or atypical method. When my brother, LibreHacker, told me about it, I was like: “I’m in.”
Now everybody has done this while using wifi in their back yard. Too easy.
Some have apparently tried Bluetooth, pen and paper transcription, and a few other “unusual” methods. Not techy enough for me.So, this may have been done before, but looking at some of the old entries I didn’t see this. So I thought I’d try it, and if you are reading this, it worked.
I am a ham radio operator. So, I set up two 2 meter radios, two signalink USB devices, direwolf, tncattach, and established an ethernet connection over the airwaves at 147.2 MHz and a baud rate of 1200 b/s between my pickup truck radio and the home ham radio computer. Yes, that is 1.2 kb/s. As in way less than a mb/s. As in, feel the pain of slowness as I keep writing about how painfully slow this connection is.
Completely disregarding all sense of cyber safety, I made a dummy account and opened telnet between the two, then using ssh keys could ssh from one computer to the next in my home network and type this on the server remotely. It is all I can do to keep this painfully slow internet connection live, but I used it to make this post.
Stay tuned for a future post with way more detail, written from the sanity of the internet conections in the mb/s speeds.
Linux – keep it simple.
EDITOR’S NOTE: There is nothing wrong with the “simple” or “Easy” way others have approached this challenge. It just wasn’t a challenge unless it was technical for me. Also, I edited this post after the fact because it was too hard to edit over the slow internet connection I was using.
gemini://alaskalinuxuser.ddns.net/2024-09-21.gmi
In today’s post, I wanted to expound on what I did, and the reasoning behind some of my odd-ball decisions.
So, as noted above, I decided going outside and using the WiFi, or Bluetooth, or some typical internet option like cellular just wasn’t enough of a challenge for me from a technical standpoint. I decided to do something that I’ve never done before. I am a ham radio operator, and I do a lot of digital modes, but I had never set up my own TCP/IP network over the airwaves, and I figured this was as good a reason as any to give it a try.
The 1978 Chevrolet K10: HTX-212 2m transceiver, Signalink USB, Panasonic Toughbook CF-74 laptop
The house: TS-700A 2m transceiver, Signalink USB, Rack-mounted 2U computer
Both computers, the laptop and home computer, were running Linux, specifically Ubuntu 22.04 and I had installed direwolf. Dire Wolf is a software “soundcard” AX.25 packet modem/TNC and APRS encoder/decoder, which can be found in most Linux distros, but also downloadable here: https://github.com/wb2osz/direwolf
I also had installed tncattach, which is a way to attach TNC devices as network interfaces. It is usually not included with most Linux distros, but can be easily downloaded here: https://github.com/markqvist/tncattach
In short, here is the overall concept:
When I wanted to send data on the laptop, it would use standard TCP/IP through the tncattach network device, which would give the data to transmit to direwolf, who, as a modem would make that into sound waves to play out my sound card, in this case the Signalink USB, which would key up and give the sound to the transceiver (radio) HTX-212, that converts it into RF energy.
The TS-700A transceiver (radio) hears the RF energy, converts it to sound that the Signalink USB hears and passes back to the direwolf modem, which interprets it as data to give to the tncattached network device of the house computer as standard TCP/IP traffic. Then the house computer responds and the whole process takes place in reverse.
Simple enough, right?
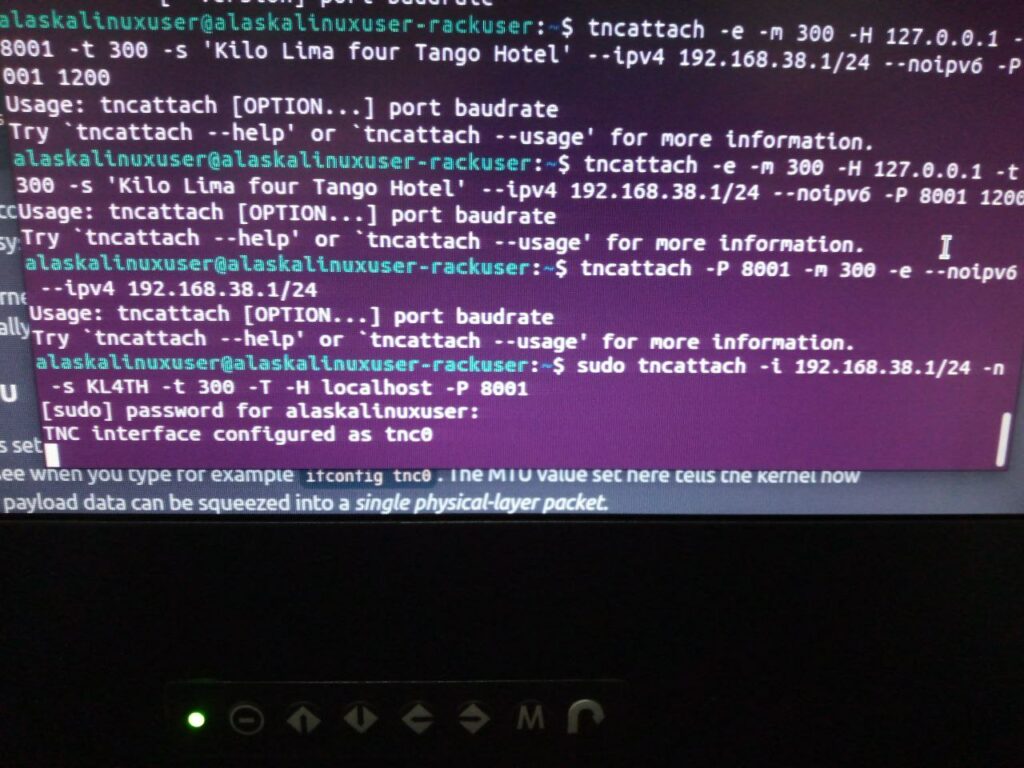
Well, it sounds fairly straight forward, but making this work took me most of the day Saturday. If you can see my screen shot above, you will note that I typed the tncattach commands dozens of times, not quite understanding the syntax of the command. I kept trying to look at examples online, but most of them used serial attached (virtual or real) devices or cables, but my instance was just using the localhost on port 8001. But if you are trying to do the same, I should write things in order. First I had to create a config file for direwolf. if you don’t have one, you can download and edit this one: https://github.com/elafargue/aprs-box/blob/master/config/etc/direwolf/direwolf.conf and here is my entire file:
#               FIRST AUDIO DEVICE PROPERTIES               #
#               (Channel 0 + 1 if in stereo)                #

# ADEVICE pasym0
# ADEVICE - plughw:1,0
# ADEVICE UDP:7355 default

# Number of audio channels for this souncard:  1 or 2.
ACHANNELS 1

#               CHANNEL 0 PROPERTIES                        #

CHANNEL 0
MYCALL KL4TH-4
MODEM 1200
#PTT GPIO 60

#               VIRTUAL TNC SERVER PROPERTIES               #

AGWPORT 8000
KISSPORT 8001

#               INTERNET GATEWAY                            #

IGTXLIMIT 6 10

TTPOINT  B01  37^55.37N  81^7.86W
TTPOINT  B7495088  42.605237  -71.34456
TTPOINT  B934  42.605237  -71.34456

TTPOINT B901  42.661279  -71.364452
TTPOINT B902  42.660411  -71.364419
TTPOINT B903  42.659046  -71.364452
TTPOINT B904  42.657578  -71.364602

TTVECTOR  B5bbbddd  37^55.37N  81^7.86W  0.01  mi

TTGRID   Byyyxxx    37^50.00N  81^00.00W  37^59.99N  81^09.99W

TTUTM  B6xxxyyy  19T  10  300000  4720000

TTCORRAL   37^55.50N  81^7.00W  0^0.02N


TTMACRO  xx1yy  B9xx*AB166*AA2B4C5B3B0A1yy
TTMACRO  xx2yy  B9xx*AB170*AA3C4C7C3B0A2yy
TTMACRO  xxyyy  B9xx*AB180*AA3A6C4A0Ayyy

TTMACRO  z  Cz
You may notice that I did not specify a device, as one usually does with aplay -l to list your sound cards and then specify a device in the direwolf conf file. I just used pulse audio defaults, which in the end worked just fine once I adjusted the volume. With that done, I opened a terminal and started direwolf:
$ direwolf -t 0The -t 0 just removes the strange color scheme that they use in the terminal. It probably serves a purpose, but it honestly made it harder for me to read the output, so I turned it off. Then I monkeyed around with the tncattach command for a while, looked up posts and videos until I finally got the right syntax with this line:
$ sudo tncattach -i 192.168.38.1/24 -n -s KL4TH -t 300 -T -H localhost -P 8001What this command says is: create a full fledged Ethernet device with IPv4 address 192.168.38.1 with a subnet of 255.255.255.0, don’t allow IPv6 (-n), use the (-s) station identifier of KL4TH, with a (-t) time of 3 seconds, (-T) over TCP/IP on (-H) Host localhost (-P) port 8001. However, even that wasn’t quite right, as it would error when it was time to “beacon” or give my station identifier over the air. Following other online examples, I realized that my ham radio call sign (KL4TH) was too short, causing an error, since apparently the transmission has to be a certain minimum size. I resolved it with this line:
$ sudo tncattach -i 192.168.38.1/24 -n -s KiloLimaFourTangoHotel -t 300 -T -H localhost -P 8001The biggest help with this command came from two sources:
Both of which were invaluable to helping me figure out the right way to use this program’s syntax.
Now that I had direwolf and tncattach working on both the laptop and in the house, it still was a while before I could successfully ping between the two. The house was 192.168.38.1, and the truck was 192.168.38.2, but sending a ping command was met by no response at first. Now, you do need a higher wait time for the response, or ping will not only send too many packets, but will not be waiting for a reply. Most of my successful replies took around 4 seconds. You can change ping’s parameters like this:
$ ping -i 10 -W 5 192.168.38.2This will only send a packet every 10 seconds, and will wait 5 seconds for a reply. But like I said, I wasn’t getting any response. I spent about an hour at this stage and then gave up. Nothing was wrong from a program standpoint, the radios were keying up and transmitting, but I couldn’t make the connection work. After a break, I went back to it, this time with a hand held 2m Boafeng UV-5R, listening to each radio as they transmit. That’s when I realized that the volume was so low, the other station couldn’t “hear” anything.
So, after spending another 10 minutes adjusting volumes, I finally got it just right, and now I had a stable, albeit slow, TCP/IP connection between the laptop in the truck and the computer in the house, over 2m airwaves. Specifically at 147.2 MHz, with a baud rate of 1200 b/s. Yes, 1.2 kb/s. That’s right, 0.0012 mb/s.
Now that I had established a connection, I had to decide how to use it. Ham radio does not allow encrypted traffic over the air waves. I couldn’t simply SSH into my other computer. Also, I didn’t want to use my real passwords over the air, where anyone could hear them. Later, I’ll talk about better options, but at this point, I simply made a new user on the home computer, and opened up the telnet program and port for communication.
On the laptop, I connected to the home computer through telnet. The connection was so slow, that if I waited for it to finish displaying “Password:” on my screen, then by the time I typed and sent the password, the connection would time out. There is probably a setting for that, but the easier option was to type the username, hit enter, then go ahead and blind type the password and hit enter, and it would all catch up in the end.
Once I got into the home computer through telnet, I was on the home computer’s command line, to which I used ssh keys and ssh from that command line to the server, and then used nano to open up a new gemlog post and typed the quoted gemlog above. Note that this does not break the “no encryption” rule of ham radio, because I was sending all of my data over the air as plain text, even though the ssh between the two home computers and server were encrypted. I didn’t do this for security, but because it was available on the server. After saving the file, I later came back and edited it and added it to the index. By edit, I mean check it over for grammar and spelling errors, etc., not changing the content of it.
Overall, a slowly painful success, where I learned lots of interesting tidbits and did something new to me. I feel I walked away from this challenge a smarter ham radio operator than I was when I started. That said, here are a few thoughts for any future use of this:
a. If I used the 70cm band (433 MHz ish) I could have had higher baud rates and this may have been less painful to do.
b. Also, I could have avoided any passwords on the air by using FTP with anonymous logins and just pushed the completed file to the other computer. (LibreHacker also rightly mentioned TFTP.)
c. I should have been audibly listening to the signal the whole time, which would have easily shaved an hour or more off of the total time of this project.
All that said, it was a fun project where I learned a lot. Perhaps next year I will do something with either sound or light as the medium of transfer, rather than through RF.
Linux – keep it simple.