In our last post, I talked about a really neat website: MechDome, which automatically converts your Android app into an iPhone application. If you haven’t read that article, I suggest you do to learn more about MechDome, which I think is going to be very big for Android developers in general. At the end of our last post, we had downloaded our converted app and run it in an iPhone simulator on our virtual Apple computer. In that post, though, I skipped all of the details of how we do that, and I would like to take a look at that question now.
So, get your Apple fired up (online, virtual, physical, etc.) and download your converted app from MechDome!
Now that you have your app downloaded, go ahead and launch Xcode. If you don’t have Xcode, it can be installed from the iStore. Once Xcode is open, go ahead and edit your preferences.
Xcode –> Preferences –> Accounts
If this is the first time you’ve been here, like it was for me, then it will be blank. press the “+” sign at the bottom and add your Apple ID account.
Once your Apple ID is added, you can now select it, and click on “View Details”. In the resulting popup, click “Create” for iOS developement. This will create the certificate you need for “signing” your test apps on your local simulator. There is not much to tell you how it went, but if the button to create disappears, it worked, so click “done”.
Now you are ready to launch the simulator. There is probably a better way to do this, but here is the simplest methode I found. Since you have Xcode open, go ahead and launch a new project. It will load fairly quickly with a default empty project. Now, press the play button at the top of the screen, which will automatically launch the simulator, boot the iPhone, and launch your empty app project.
Once that is open, you are litterally done with Xcode, so you can quite or close it, and the simulated iPhone will stay open.
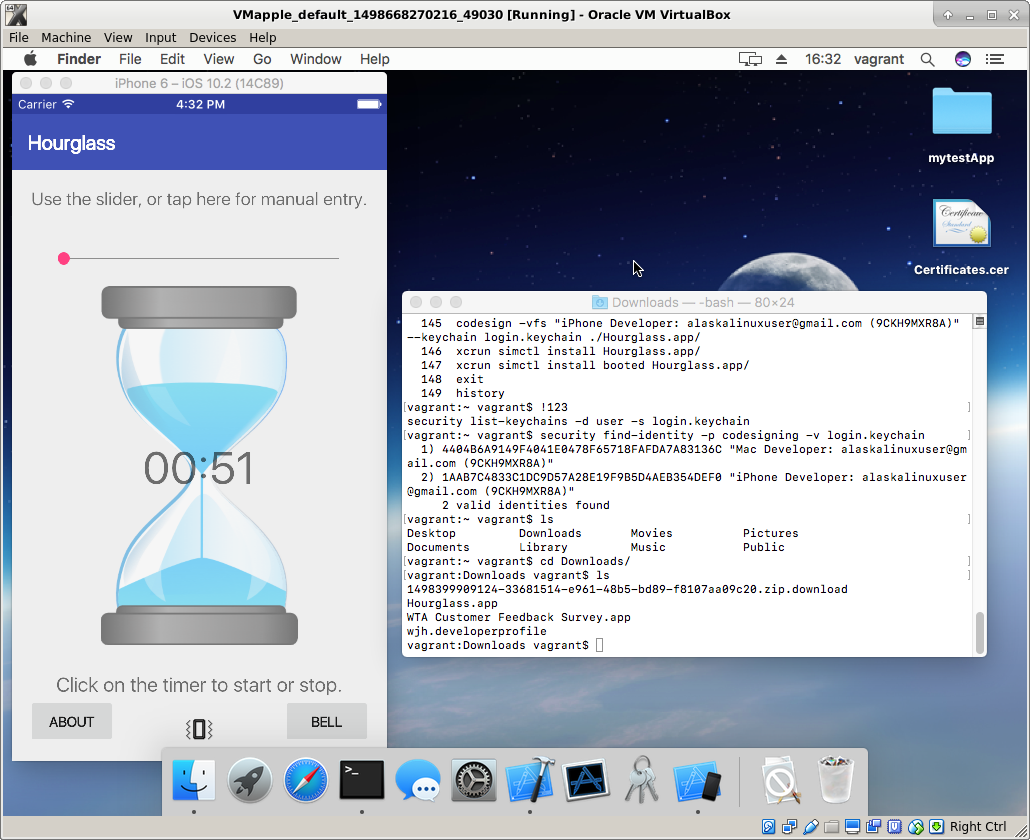
Click on the iPhone window, and from the top menu, select Hardware –> Home to get back to the iPhone home screen.
Now open your OSX terminal. You can open it from the launcher by typing term and clicking on the terminal icon.
In your terminal, navigate to the downloaded zip file. For me, it was in “Downloads” and looked like an “app” but it was a directory.
$ cd Downloads
$ ls
stuff
stuff
stuff
Hourglass.app
stuff
etc….
Now, find your new certificate (key) to sign the app with:
$ security find-identity -p codesigning -v login.keychain
1) ALPHANUMERIC4404038dkldsf03893 “NAMEOFCERT: APPLEID@EMAIL (MOREALPHANUMERIC)”
2) ALPHANUMERIC4404038dkldsf03893 “NAMEOFCERT: APPLEID@EMAIL (MOREALPHANUMERIC)”
3) ALPHANUMERIC4404038dkldsf03893 “NAMEOFCERT: APPLEID@EMAIL (MOREALPHANUMERIC)”
And set the default keychain:
$ security default-keychain -s login.keychain
And sign your “app”:
$ codesign -vfs “NAMEOFCERT: APPLEID@EMAIL (MOREALPHANUMERIC)” –keychain login.keychain ./Hourglass.app/
Now that it is signed, you can install it into the already running iPhone simulator with the following:
$ xcrun simctl install booted Hourglass.app/
You should see it show up on your iPhone home screen, but it may be on one of the other screens, so swipe left and right to find it. Once you found it, go ahead and click on it to launch the app! There you go! Barring any other issues, it should work as expected.
Apple – er, uh, wait! Linux – keep it simple!
One Reply to “Signing and installing your MechDome converted app on a simulated iPhone”