Over the past couple months, I’ve been slowly working my way into the digital HAM radio scene. It’s been a lot of fun, but a little slow going, as some things were not as obvious as they at first seemed. It’s taken quite a while to learn the “ins and outs” of using digital modes, and it has been a little bit of an extra challenge doing them with an older radio that is:
- Analog
- Tube driven
- Has no CAT controls
What that means is that I don’t have computer control over the radio frequencies and I have to set everything manually. Because it is an older tube radio, I also have quite a bit of drift for the first 30 minutes of operation. And, because it is analog and not digital, it can be really interesting trying to fine tune, or “dial in” on a set frequency. It’s pretty easy to dial in 14.095, but not as easy to dial in 14.0956, specifically. That just so happens to be the frequency in use for WSPR (Weak Signal Propagation Reporting).
Never the less, I’m actually having a lot of fun with it. Perhaps if I had a digital radio with CAT computer control, then some of the magic of doing this would be lost. At the very least, I feel that I am learning more about the process because I have to control each part of it. If you are trying to do this, then perhaps this will be helpful for you to derive your setup from. I am using a TS-820s and a SignaLink USB to allow the computer to transmit the signal through the radio. Here is my radio setup:
1. Power on, heater on.
2. Function switch to VFR.
3. Band select to 14.
4. RF ATT switch to off.
5. RIT on and centered (you can use it to fine tune later).
6. Mic/Car you will adjust while transmitting so as to show no ACL on meter, so pretty low, like 2 or 3.
7. RF GAIN - Maxed.
8. AF GAIN - 2. (If this is too high, you will get noise. If it is to low, you won't get the signals. Generally, the lower the better for digital.)
9. Drive, above middle for my old tubes - YMMV.
10. Plate, dipped for 14.
11. Load, as low as possible so as not to have any ALC when transmitting.
12. Fixed Channel, Delay, anti-vox, vox gain, all of these are N/A.
13. Compressor level pushed in so it is not active.
14. VFO, to the desired band, in this case 14.0956 (or just between 095 and 096).
15. Mode select switch to USB (Upper Side Band).
16. Send/receive to receive.
17. Vox/man to man.
18. NB/off to off.
19. Moni/off to off.
20. Off/fast/slow to slow.
21. Meter to ALC.
Now that the radio is set up, I set up the SignaLink USB with:
- Transmit to 3.
- Receive to 5.
- Delay to 0.
- Power on.
And on the computer, I am using WSJTX version 2.4, with input volume on the computer around 20%, output volume on the computer around 60%. Again, your mileage may vary, the key part here is the volume needs to be high enough that it keys the Signalink on transmit. I tried several ways, but in this example, I was shooting for 5 watts output power measured at my antenna tuner.
In WSJTX, I dropped the power down two notches (on the right side bar) and set my mode to WSPR. Of course, you need to make sure that the USB device is selected for input/output under settings, and you need to make sure that you have set your call sign in WSJTX. You can check through some of my earlier posts if you need a hand setting up WSJTX for general use.
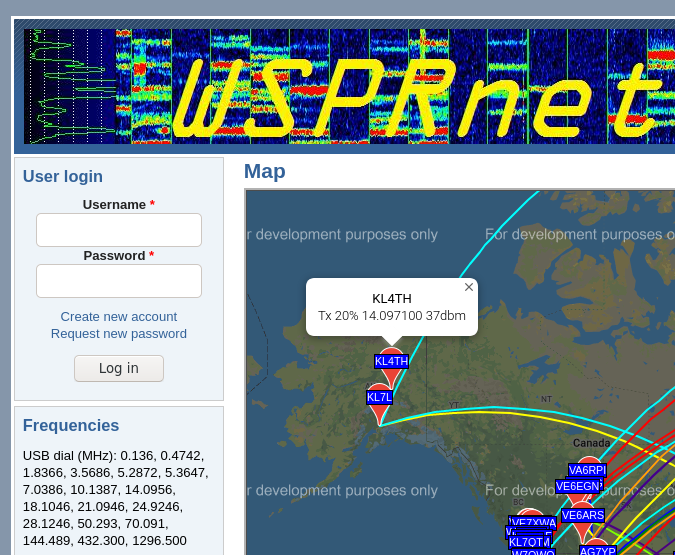
Once this was all set up, I selected the “Transmit next” button, and waited. Apparently, WSPR is started every two minutes and runs for two minutes, so it actually took more than a minute for it to start transmitting. While I was waiting, I headed over to https://wsprnet.org to bring up the tables and maps to see if they could hear me. If you click on “Activity” at the top right of the website, you will be greeted with a table of the latest WSPR reports received. Or, if you click on “Map” you will see the signals received over the last ten minutes superimposed over a Google map.
One benefit of using the map is that it connects your transmitted signal with the person who received it, which is helpful in knowing where you were “heard” at. From what I understand, you can’t really use this as an accurate way to determine your transmit pattern, since it doesn’t necessarily link you to every person that heard you. It only took a few minutes for my signal to show up on the map.
Either way, it was a fun experiment and very helpful to know that I was not only transmitting, but being heard somewhere else! This was a great way to prove my setup of digital mode, computer transmit, radio setup, antenna setup, and tuner control. Definitely a good idea to keep this handy as a troubleshooting tool if you are having trouble with digital modes.
Linux – keep it simple.