
I’m still trying to catch up on some of my new toys that I bought/got around Christmas time. I know, I’m four months behind! One of those gadgets was a Nokia 5110 LCD screen, and this thing is fun! It looks like something they used to use in old Nokia cell phones, and it works great for a monochrome, low resolution display.
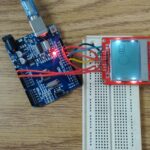
I’m driving it with an Arduino Uno board. At first, to make sure I understood how to use it, I watched InterlinkKnight’s Youtube tutorial, which you also should check out. It was very clear, highly informative, and really well put together.
After watching the tutorial, and loading the library and his sketches, I then set out to make my own. I noticed a couple of things that were noteworthy for the new user, so I thought I’d share them here.
First, you need the library. You can get it here: https://github.com/olikraus/U8glib_Arduino
Just unzip the library, and put it in your Arduino library folder (unzipped, of course). For me, on my Ubuntu Linux machine, that was in /home/alaskalinuxuser/Arduino/libraries/, where I just dropped off the unzipped folder from U8. If you don’t put this in your Arduino libraries, it can’t find the referenced include file, and this wont work.
Then I made my own sketch:
/*
This is an example on how to use the display known as Nokia 5110 SPI with PCD8544 driver using the U8GLIB library.Nokia 5110 SPI display pins for Arduino Uno/Nano:
* RST = 8
* CE = 10
* DC = 9
* DIN = 11
* CLK = 13
* VCC = 5V
* BL = 3.3V
* GND = GROUNDWe use this library: https://github.com/olikraus/U8glib_Arduino
User Reference Manual: https://github.com/olikraus/u8glib/wiki/userreference
List of fonts: https://github.com/olikraus/u8glib/wiki/fontsize
Sketch Originally made by: InterlinkKnight
This sketch was featured on his video tutorial for this display: https://www.youtube.com/watch?v=1ZvY_lb6BoU
Last modification: 11/22/2017Sketch modified by alaskalinuxuser
Last modification: 04/02/2019
*/#include “U8glib.h” // Include U8glib library
// Create display and set pins:
U8GLIB_PCD8544 u8g(13, 11, 10, 9, 8); // (CLK=13, DIN=11, CE=10, DC=9, RST=8)int Variable1; // Create a variable to have something dynamic to show on the display
int fadeAmount = 1; // how many points to change byvoid setup(void) // Start of setup
{// Select a font:
u8g.setFont(u8g_font_profont12);// Change display orientation:
//u8g.setRot90();
u8g.setRot180();
//u8g.setRot270();} // End of setup
void loop(void) // Start of loop
{
// wait for 25 milliseconds to see the dimming effect
delay(25);// change the brightness for next time through the loop:
Variable1 = Variable1 + fadeAmount;// reverse the direction of the fading at the ends of the fade:
if (Variable1 <= 0 || Variable1 >= 45) {
fadeAmount = -fadeAmount;
}u8g.firstPage(); // Beginning of the picture loop
do // Include all you want to show on the display:
{
u8g.drawCircle(41, 21, Variable1, U8G_DRAW_ALL); // Draw a circle (x,y,radius,option)u8g.drawRFrame(59, 10, 25, 13, 3); // Draw a rounded square (x,y,width,height,radius)
// Variable with left text alignment:
u8g.setPrintPos(63, 20); // (x,y)
u8g.print(Variable1); // Value to print
} while(u8g.nextPage()); // End of the picture loop} // End of loop
The key part of what I was playing with, was using a variable to set the circle size. Every run of the loop, after a slight delay, the circle is increased or decreased in size to make it grow or shrink on the screen. This makes a very nice “pulse” effect. Most of the code here was originally in InterlinkKnight’s sketch, I just modified it for my use, and added a variable changer.
Another thing I noticed was the back lighting. On my Nokia 5110, it is labeled as “BL” which means you apply voltage to it to illuminate the back lighting of the screen. In his tutorial, he rightly mentioned that you could use 5 volts here, which works great, but I found it to be obnoxiously bright. Instead, I used the 3.3 volt output from the Uno, and that was much better on the eyes. The screen will work without the back lighting, but then you need ample light to view it.
I’m seeing some fun potential with this screen!
Linux – keep it simple.